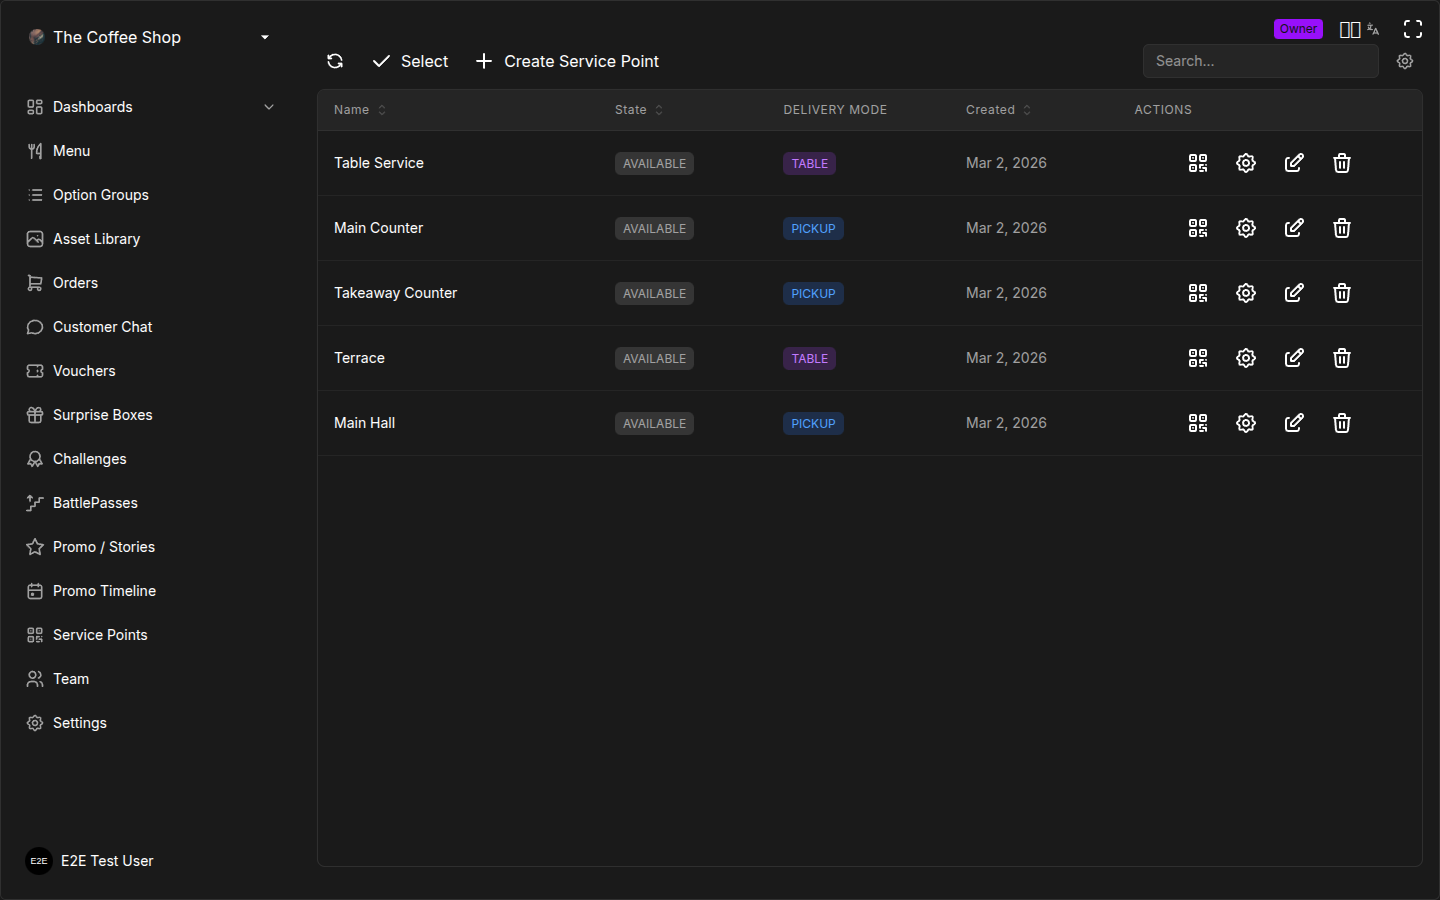
Service Point Setup
Service points are the foundation of how OKeep connects customers to your kitchen. Each service point represents an ordering location -- a table, counter, terrace section, or any spot where customers scan a QR code to place orders.
What Is a Service Point?
A service point is a virtual ordering location tied to a physical spot in your restaurant. When a customer scans the QR code for a service point, they see your menu and can place an order that goes straight to your kitchen display.
Each service point has:
- A name that your staff sees on orders (e.g., "Table 5", "Terrace A")
- A unique QR code that customers scan to start ordering
- A delivery mode setting that controls how orders are fulfilled
- A status that determines whether customers can order from it
You may see the term "Printer" in some parts of the system. Service points were originally called printers -- they mean the same thing.
Creating a Service Point
- Go to Service Points in the CRM sidebar
- Click Create Service Point in the top-right corner
- Enter a Name for the location (e.g., "Table 1", "Counter", "Patio B")
- The Available toggle is on by default -- leave it on so customers can order immediately
- Click Create
Your new service point appears in the list and is ready for customers.
Create all your service points at once before printing QR codes. This way you can download them in bulk (see Bulk QR Download below).
Service Point Settings Reference
Every service point has the following configurable fields. Each one is explained in detail below.
| Field | Required | Default | Description |
|---|---|---|---|
| Name | Yes | -- | The label staff sees on orders and kitchen display |
| Available | No | On (Active) | Whether customers can order from this point |
| Default Delivery Mode | No | No Default (App decides) | Pre-selected delivery mode for orders |
| Auto-Disconnect | No | Varies | Automatic session cleanup after inactivity |
| OTP Verification | No | Off | One-time password verification for customer identity |
Name
The name appears on every order from this service point. Your kitchen and wait staff use it to know where to deliver food, so choose clear, recognizable names.
Valid values: Any text. Short, recognizable labels work best (2--4 words).
| Good Names | Names to Avoid |
|---|---|
| Table 1, Table 2, Table 3 | T1, T2, T3 |
| Terrace A, Terrace B | New printer, Test |
| Counter, Bar | Printer 47 |
| VIP Room, Private Dining | asdf, temp |
Use names your staff already use in conversation. If the kitchen calls it "the window table", name it "Window Table" -- not "Table 7B" or "SP-014".
Available Toggle
Controls whether customers can order from this service point.
| Status | Badge Color | QR Code Behavior | What Happens |
|---|---|---|---|
| Available (on) | Green "ACTIVE" | Scans normally | Customers can browse menu and place orders |
| Unavailable (off) | Gray "INACTIVE" | Scans but shows unavailable message | Customers cannot place orders |
When to set unavailable:
- Closing a section of your restaurant for the evening
- A table is reserved for a private event
- Maintenance or cleaning in progress
- Seasonal areas (outdoor terrace closed in winter)
Toggling a service point to unavailable does not affect orders that are already in progress. Existing orders continue through their normal lifecycle. Only new orders are blocked.
Default Delivery Mode
Each service point can have a pre-selected delivery mode that determines how customers receive their orders. Configure this by clicking the gear icon on a service point row.
| Mode | Value | Best For | What Happens |
|---|---|---|---|
| No Default | App decides | Flexible locations | The customer chooses their delivery mode at checkout |
| Pickup / Takeaway | PICKUP | Counter QR codes, takeaway windows | Customer picks up the order at the counter; pre-selected at checkout |
| Table Service | TABLE | Table QR codes | Staff delivers the order to the customer's table; pre-selected at checkout |
How delivery modes affect the order flow:
- Pickup: After the order is marked "Ready for Pickup" in the kitchen, the customer gets a push notification to come collect it. The kitchen display shows a pickup badge.
- Table Service: After the order is marked "Ready for Pickup", wait staff see it on their waiter dashboard and deliver it to the table. The service point name tells them where to go.
- No Default: The customer picks between Pickup and Table Service during checkout. Use this for shared QR codes that serve both walk-up and seated customers.
Set Table Service for QR codes placed on individual tables. Set Pickup for QR codes at the counter or entrance. This way, customers do not need to choose every time -- the correct option is pre-selected for them.
To configure the delivery mode:
- Find the service point in the list
- Click the gear icon in the row actions
- Select the desired delivery mode
- Click Save Configuration
Auto-Disconnect Settings
Auto-disconnect controls what happens to a customer's session after a period of inactivity. When enabled, the system automatically disconnects idle users from the service point, freeing it for the next customer.
This is configured at the merchant level but applies per service point. Consult your Merchant Settings for the global auto-disconnect configuration.
Why auto-disconnect matters:
- Prevents abandoned sessions from cluttering your active user list
- Frees up service points for new customers
- Cleans up incomplete carts
OTP Verification
When OTP verification is enabled for a service point, customers must enter a one-time password (displayed on the table or provided by staff) before they can access the menu. This adds a layer of verification to ensure the customer is physically present at the location.
When to use OTP:
- High-security service points (VIP areas)
- Locations where you want to prevent remote ordering (someone scanning a photo of your QR code from home)
When to skip OTP:
- Standard tables and counters where frictionless ordering is the priority
- Takeaway windows where speed matters most
QR Codes
Every service point gets a unique QR code. When scanned, it opens your menu for that specific location.
Viewing a QR Code
- Find the service point in the list
- Click the QR code icon in the row actions
- The QR code appears in a popup
Downloading a QR Code
From the QR code popup:
- Optionally customize the foreground and background colors using the color pickers
- Click Download QR
- The QR code saves as a PNG image
If you have a custom QR template set up in Merchant Settings, the QR code popup will show your branded template instead of the simple colored version. You can edit the template directly from the popup by clicking Edit Template.
Bulk QR Download
To download QR codes for multiple service points at once:
- Click Select in the top-right corner to enter selection mode
- Check the service points you want (or click Select All)
- Click Download QR Codes
- A progress indicator shows the download status
- All selected QR codes download as individual PNG files
This is especially useful when setting up a new location or reprinting all your QR codes after a template change.
QR Code Printing Recommendations
| Location | Recommended Size | Material | Tip |
|---|---|---|---|
| Table surface | 5--7 cm (2--3 in) | Laminated sticker or acrylic stand | Waterproof so spills do not damage it |
| Table tent/stand | 7--10 cm (3--4 in) | Cardstock or acrylic | Place at eye level for easy scanning |
| Wall or pillar | 15--20 cm (6--8 in) | Printed poster or vinyl | Add brief text: "Scan to Order" |
| Counter | 7--10 cm (3--4 in) | Acrylic stand | Position where customers naturally look while waiting |
| Menu board | 10--15 cm (4--6 in) | Integrated into the design | Works well next to the menu for counter-service spots |
General printing tips:
- Test after printing. Always scan the printed QR code with your phone before placing it. Printing at too small a size or on glossy surfaces can make codes unscannable.
- Use high contrast. Dark QR code on a light background works best. Avoid low-contrast combinations (light gray on white, dark code on dark background).
- Include a call to action. Add text like "Scan to order" or "Scan for menu" near the QR code so customers know what to do.
- Avoid lamination bubbles. If laminating, smooth out any air bubbles over the QR code area. Bubbles distort the pattern and can prevent scanning.
Replace damaged or faded QR codes immediately. A customer who cannot scan a code cannot order, which means lost revenue and a poor first impression.
QR Code Placement Strategy
For table service restaurants:
- One QR code per table, placed in a consistent location (center, near the condiments, on the table stand)
- Customers should not have to move or reach to scan
For counter-service / fast-casual:
- One QR code at the ordering counter
- Consider an additional QR code at the entrance for customers who want to browse the menu while waiting in line
For mixed (table + takeaway):
- Table QR codes set to Table Service delivery mode
- Counter QR code set to Pickup delivery mode
- This way customers at tables get table delivery by default, and counter customers get pickup by default
Delivery Modes Explained
Delivery modes control how the order is handled after the kitchen prepares it. Understanding them is important for setting up service points correctly.
Pickup (Takeaway)
The customer collects the order from the counter or a designated pickup area.
Order flow:
- Customer scans QR code and places order
- Kitchen prepares the order (status: Preparing)
- Kitchen marks the order as Ready for Pickup
- Customer receives a push notification: "Your order is ready!"
- Customer goes to the counter and collects the order
- Staff marks the order as Closed
Best for: Counters, takeaway windows, food trucks, cafeterias.
Table Service
Staff delivers the order to the customer's table.
Order flow:
- Customer scans QR code at their table and places order
- Kitchen prepares the order (status: Preparing)
- Kitchen marks the order as Ready for Pickup
- The order appears on the waiter dashboard with the service point name (e.g., "Table 5")
- Waiter delivers the order to the table
- Waiter marks the order as Closed
Best for: Sit-down restaurants, cafes with table service, hotel dining.
No Default (Customer Chooses)
The customer selects their preferred delivery mode during checkout.
Order flow:
- Customer scans QR code and places order
- At checkout, the customer chooses between Pickup and Table Service
- The rest of the flow follows the selected mode
Best for: Flexible locations that serve both walk-up and seated customers, shared QR codes in common areas.
Managing Service Points
Editing a Service Point
- Click the pencil icon on the service point row
- Update the Name or Available toggle
- Click Update
Name changes take effect immediately on new orders. Existing in-progress orders keep the old name.
Configuring Delivery Mode
- Click the gear icon on the service point row
- Choose a delivery mode
- Click Save Configuration
Deleting a Service Point
- Click the trash icon on the service point row
- Confirm the deletion
Deleting a service point makes its QR code permanently invalid. Any printed codes for that service point will stop working. If you only need to temporarily stop orders, use the Available toggle instead.
Refreshing the List
Click the refresh icon in the table header to reload service point data. This is helpful if another staff member has made changes.
Organizing Your Service Points
By Area
Create service points that match your physical layout:
- Indoor: Table 1, Table 2, Table 3, ...
- Terrace: Terrace A, Terrace B, Terrace C
- Bar: Bar Left, Bar Right
- Counter: Counter (single point for takeaway)
Naming Conventions
Pick a consistent pattern and stick with it:
- Use numbers for identical spots: "Table 1", "Table 2", "Table 3"
- Use letters for sections: "Terrace A", "Terrace B"
- Use descriptive names for unique areas: "VIP Room", "Private Dining", "Window Seat"
How Many Service Points Do You Need?
| Setup | Recommendation |
|---|---|
| Small cafe (5--10 seats) | 1 counter point + 3--5 table points |
| Medium restaurant (20--40 seats) | 1 counter point + 10--20 table points |
| Large restaurant (50+ seats) | 1--2 counter points + tables grouped by section |
| Takeaway only | 1 counter point is enough |
It is better to have one service point per table than one per area. Individual table points let your kitchen and wait staff know exactly where to deliver each order.
Frequently Asked Questions
Can I change the delivery mode later?
Yes. Click the gear icon on the service point row, select a new delivery mode, and save. The change takes effect immediately for new orders. Orders already in progress are not affected.
What happens if I delete a service point?
The service point's QR code becomes permanently invalid. Any printed QR codes for that service point will stop working -- customers who scan them will see an error. Orders that were already placed from that service point are not affected; they continue through their normal lifecycle.
If you might need the service point again, use the Available toggle to disable it instead of deleting.
How many service points do I need?
One per physical ordering location is the recommendation. For a 15-table restaurant, create 15 table service points plus one counter service point. Having too few (one per "area") means your kitchen does not know which specific table to deliver to. Having too many (multiple per table) adds unnecessary complexity.
Can two tables share the same QR code?
Technically, yes -- but it is not recommended. If two tables share a QR code, all orders from both tables appear under the same service point name. Your staff will not be able to tell which table the order belongs to. Use one QR code per table for clear delivery routing.
What happens to orders if I disable a service point?
Orders that are already in progress continue normally. Only new orders are blocked. Customers who scan the QR code will see a message that the service point is currently unavailable.
Can I use service points without QR codes?
Service points are designed around QR code scanning, but staff can also create orders manually through the CRM's order creation panel and assign them to a service point. This is useful for phone orders or walk-in customers who do not have a phone.
Do service points work with the customer web (browser ordering)?
Yes. When a customer scans a service point's QR code, the menu opens in their phone's browser. No app download is required. The customer can browse, customize, and place an order directly from the browser. If they have the OKeep mobile app installed, the QR code can also open the menu in the app.
Troubleshooting
QR code does not scan
- Check the print quality. Faded, damaged, or too-small codes cannot be read. Reprint at the recommended size.
- Check the contrast. The QR code needs a clear contrast between foreground and background. Dark on light is best.
- Check for obstructions. Lamination bubbles, sticker edges, or shadows over the code can block scanning.
- Test with multiple phones. If only one phone cannot scan, the issue is with that phone's camera, not the QR code.
QR code scans but menu does not load
- Check internet connection. The customer's phone needs an internet connection to load the menu.
- Check if the service point is available. If the Available toggle is off, the menu will not load for customers.
- Check if the service point was deleted. Deleted service points produce invalid QR codes. If the code was for a deleted point, create a new service point and reprint the code.
Orders showing wrong service point name
If you renamed a service point, in-progress orders keep the old name. Only new orders use the updated name. This is by design to avoid confusion on orders that are already being prepared.
Best Practices
- Name service points for staff, not for the system -- use names your team already uses for tables and areas
- Set delivery modes on every service point so customers do not have to choose manually
- Test every QR code after printing by scanning it with your phone
- Disable rather than delete service points you might use again later
- Review your list regularly -- remove service points for tables that no longer exist
- Print backup QR codes and keep them stored safely in case you need quick replacements
- Use consistent naming across all service points so kitchen staff can immediately identify locations
Related Pages
- QR Codes -- printing tips and best practices for QR placement
- Service Point Troubleshooting -- fix common QR and ordering issues
- Merchant Settings -- configure global delivery modes and payment methods
- Kitchen Display -- see how orders from service points appear in the kitchen