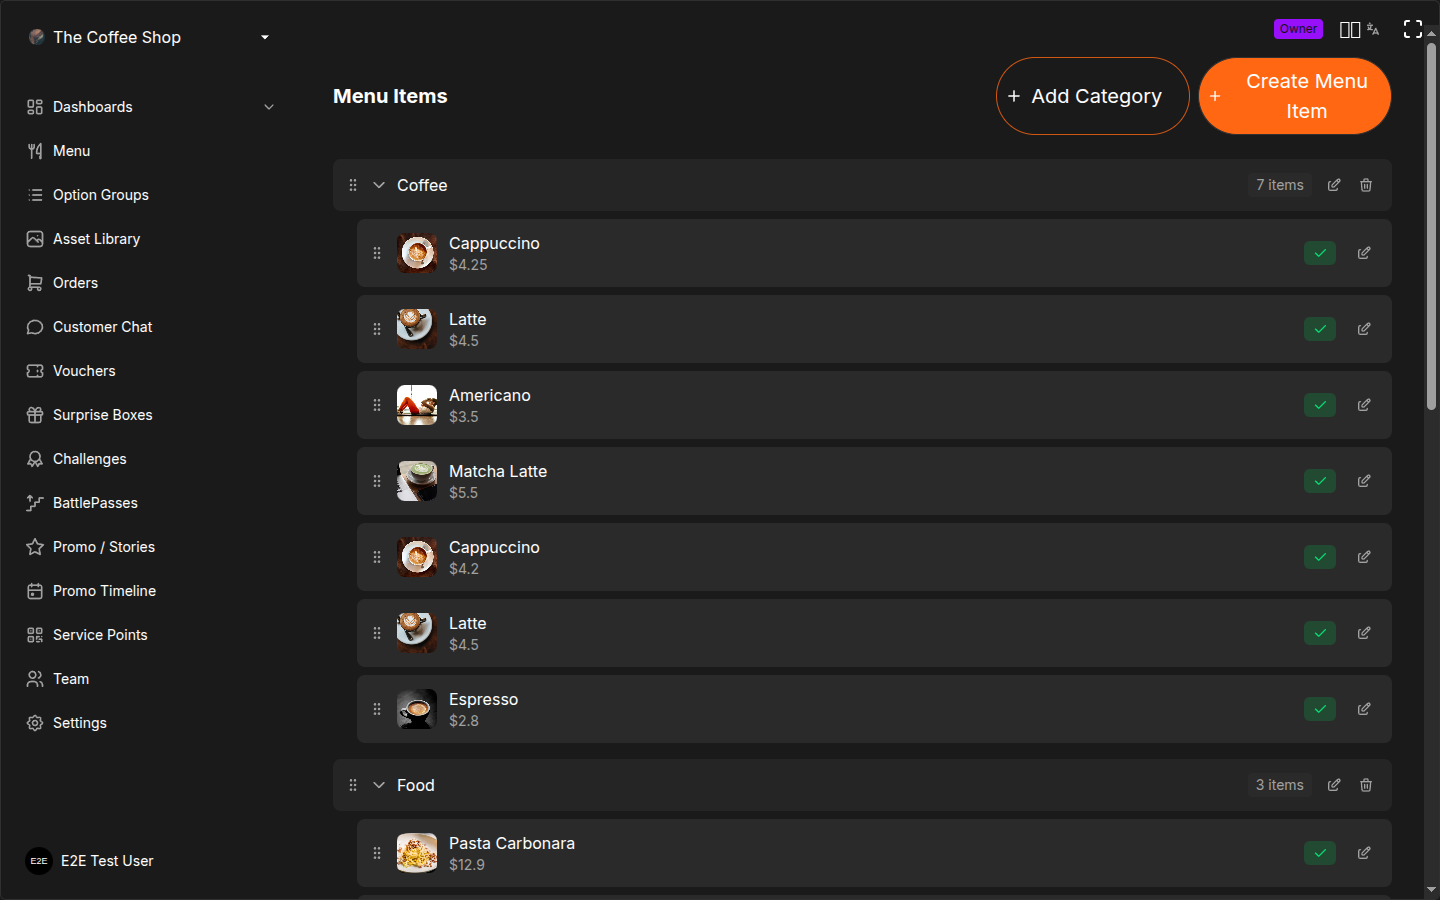
Menu Items
Menu items are the products your customers see and order -- a Cappuccino, a Margherita Pizza, a Caesar Salad. Each item has a name, a price, and belongs to a category. Beyond those basics, you can add descriptions, images, option groups, and control visibility to create a menu that is both informative and easy to browse.
This page is the complete reference for everything about menu items. For a quick step-by-step walkthrough, see Add a Menu Item.
What Makes a Good Menu Item
Before diving into the mechanics, here is what separates a menu item that gets ordered from one that gets skipped:
- A clear, specific name. "Iced Vanilla Latte" tells the customer exactly what they are getting. "Drink #3" does not.
- An appetizing photo. Items with images consistently get more orders. A good photo sets expectations and makes the item feel real.
- A helpful description. Two sentences that mention key ingredients, flavor profile, or dietary info. "Rich espresso with steamed oat milk and a hint of vanilla. Vegan-friendly."
- An accurate price. The base price should reflect what a customer pays with the default options. Surprises at checkout erode trust.
Navigating to Menu Items
- Open the CRM and select your merchant from the sidebar
- Click Menu in the left sidebar
You will see your menu items organized by category. Each category section is collapsible and shows the number of items it contains. Items without a category appear in an Uncategorized section at the bottom.
Creating a New Menu Item
- Click the Create Menu Item button in the top-right corner
- A full-screen wizard opens with four steps: Start, Details, Options, and Review
Step 1: Start (Template Selection)
Choose a Quick Setup template to pre-fill common settings, or click Create Custom Item to start from scratch.
| Template | Best For |
|---|---|
| Hot Drink | Coffee, tea, hot chocolate |
| Cold Drink | Smoothies, juices, iced drinks |
| Sandwich | Sandwiches, wraps, paninis |
| Salad | Fresh salads and bowls |
| Main Course | Hot dishes, grills, pasta |
| Dessert | Sweets, cakes, ice cream |
Selecting a template automatically suggests a category and moves you to the next step. Templates are a time-saver, not a constraint -- you can change everything in the Details step.
Step 2: Details (Basic Information)
This is where you define what the item is. Every field is described in full detail below the summary table.
| Field | Required | Default | Description |
|---|---|---|---|
| Name | Yes | -- | The name customers see on their phone |
| Price | Yes | -- | Base price in your currency. Must be at least 1. |
| Description | No | Empty | Short text to help customers decide |
| Image | No | Placeholder | Photo from the Asset Library |
| Category | No | Uncategorized | Which category this item belongs to |
Name
The Name is the single most important field. It is what customers see on the item card in the mobile app and browser menu, on the order confirmation screen, and on the kitchen display when staff prepare the order.
Valid values: Any text. There is no enforced character limit, but names longer than about 40 characters get truncated on mobile screens.
Tips for writing good names:
- Be specific. "Iced Vanilla Latte" is better than "Latte" or "Coffee".
- Include the key differentiator. If you have three types of burger, name them "Classic Beef Burger", "Spicy Chicken Burger", "Veggie Burger" -- not "Burger 1", "Burger 2", "Burger 3".
- Avoid internal jargon. Customers do not know what "SKU-447" or "Combo B" means.
- If your customer base is multilingual, consider including a second language in parentheses: "Cappuccino (Капучіно)".
The name appears on kitchen tickets too. Keep it clear enough that kitchen staff can identify the item at a glance during a busy service.
Price
The Price is the base amount the customer pays when they select default options. It appears on the item card and is the starting point for all price calculations.
Valid values: Any number greater than or equal to 1. Decimal values are supported (e.g., 4.50).
How options modify the price:
The base price is not necessarily the final price. When a customer selects non-default options, price deltas from attached option groups are added. For example:
| Component | Amount |
|---|---|
| Base price (Latte) | 4.50 |
| Size: Large (+1.00) | +1.00 |
| Milk: Oat (+0.50) | +0.50 |
| Customer pays | 6.00 |
The base price should always match the cost with default options selected. If "Small" and "Regular Milk" are your defaults, those options should have deltas of +0.00. Only upgrades add to the price.
If you change the price of an item, the new price applies only to future orders. Orders that are already in progress keep the price that was active when they were placed. There is no need to worry about disrupting orders that are currently being prepared.
Description
The Description is an optional short text that appears below the item name in the customer app. It helps customers decide whether to order the item.
Valid values: Any text. There is no hard character limit, but keep it to one or two sentences (roughly 80--150 characters). Longer descriptions get truncated on smaller screens.
When to use it:
- To highlight key ingredients: "Grilled chicken breast with avocado, mixed greens, and honey-mustard dressing"
- To mention dietary information: "Gluten-free. Contains nuts."
- To describe the flavor profile: "A bold double espresso balanced with creamy steamed milk"
- To note portion size: "Serves 2--3 people"
When to skip it:
- Items with self-explanatory names ("Orange Juice", "Mineral Water") do not need descriptions.
- If you are in a rush during initial setup, skip descriptions and add them later. The name and price are enough to get started.
Items with both an image and a description get significantly more orders than items with just a name and price. Always add both when possible.
Image
The Image field uses the Asset Library -- your centralized collection of images. When you click the image selector:
- Your existing images appear in a browsable gallery
- Select an image to assign it to this item
- If you need a new image, upload one directly from this screen
Images are tagged with menu-item for easy filtering. Once assigned, the image appears in the customer app as the item's card photo.
Recommended specifications:
| Property | Recommendation |
|---|---|
| Aspect ratio | Square (1:1) or 4:3 |
| Minimum size | 400 x 400 px |
| Ideal size | 800 x 800 px |
| Formats | JPG, PNG, WebP |
| Max file size | Determined by Asset Library upload limits |
Tips for appetizing menu photos:
- Lighting matters most. Natural light or bright, even artificial light. Avoid harsh shadows.
- Close-up angle. Fill the frame with the food. The item should be the star, not the plate or table.
- Consistent style. Use the same background, angle, and lighting across your menu. This makes the menu feel professional and cohesive.
- Avoid clutter. One item per photo. Do not include hands, cutlery, or busy backgrounds.
- Show the real product. Customers feel deceived when the photo looks nothing like what they receive.
If no image is set, a placeholder icon appears on the item card. While the item is still orderable, items without photos get fewer orders. Add images to your top sellers first if you cannot photograph everything at once.
Category
The Category determines where the item appears in the customer's menu tabs. Each item belongs to one category.
Valid values: Select from your existing categories, or create a new one inline.
Effect on customer navigation: Categories appear as horizontal tabs at the top of the customer's menu screen. Customers tap a tab to see only the items in that category. The order of tabs matches the order you set in the CRM. See Categories for the full reference.
Creating a category inline:
- Start typing the name of a category that does not exist yet
- A "Create..." option appears in the dropdown
- Select it to create the category and assign it immediately
Items in the Uncategorized section are harder for customers to find and make your menu look unfinished. Always assign items to a proper category.
Step 3: Options (Customization)
This step lets you attach option groups so customers can customize their order. The step has three tabs, one for each option group type:
- Ingredients -- standard components customers can remove ("no onions")
- Options -- single-choice selections ("Size: Small / Medium / Large")
- Modifiers -- quantity-based extras ("Extra Shot x2")
To attach an option group:
- Switch to the relevant tab
- Use the dropdown to select an existing option group from your library
- The group is linked immediately
For each linked group, you can customize how it behaves for this specific item:
- Override the title shown to customers (e.g., "Choose Your Size" instead of just "Size")
- Set as required so customers must make a selection before adding to cart (Options type only)
- Hide specific options that do not apply to this item (e.g., hide "XL" for a kids' menu drink)
- Override prices for individual options on this item
- Change the default selection
- Add custom options unique to this item that are not part of the original group
Option groups are reusable across your entire menu. Create them once in the Option Library, then link them to as many items as you need. See Options & Extras for the full guide on creating and managing option groups.
Validation Warnings
The Options step shows warnings if there are problems with your configuration:
- An option group with no options added yet
- An Options-type group with no default selection
- A default option that has a price delta (which affects the displayed price)
Resolve all warnings before proceeding to get the best customer experience.
Step 4: Review
The final step shows a summary of everything you have configured:
- Name and price
- Number of ingredient, option, and modifier groups attached
- Active/hidden status
Click Edit Details or Edit Options to go back and make changes. When satisfied, click Create Item to save.
Live Mobile Preview
While editing, a Mobile Preview panel appears on the right side of the screen. It shows exactly how your item will look to customers in the mobile app:
- The image (or a placeholder if none is set)
- Name and price
- Ingredient tags
- Option and modifier indicators
- The "Add to cart" button
This preview updates in real time as you edit. Use it to verify that your item looks right before saving.
Editing an Existing Item
- Find the item in the menu view
- Click the edit (pencil) icon on the item row
- The same wizard opens, starting at the Details step
- Make your changes across any step
- Click Update Item on the Review step to save
Active and Hidden Status
Every menu item has an Active toggle in the top-right corner of the item form.
| Status | Visible to Customers | Orderable | Configuration Preserved |
|---|---|---|---|
| Active | Yes | Yes | Yes |
| Hidden (inactive) | No | No | Yes -- name, price, description, image, option groups all kept |
Use cases for hiding items:
- Seasonal items that are out of season
- Items temporarily out of stock (longer-term)
- New items being prepared for launch that are not ready yet
- Items you want to retire but might bring back
Hiding is almost always better than deleting. When you hide an item, you keep the name, price, description, image, and all option group links. When the item comes back in season or back in stock, just flip it back to Active.
Sold Out (Temporary Unavailability)
If an item runs out during service but will be available again soon (next day, next delivery), you can mark it as sold out rather than hiding it entirely.
How sold out differs from hidden:
| Behavior | Sold Out | Hidden |
|---|---|---|
| Visible on customer menu | Yes (grayed out with "Sold Out" badge) | No |
| Orderable | No | No |
| Automatically restores | Depends on your restock process | Must be manually re-activated |
Sold out is the right choice for temporary unavailability during service ("we ran out of salmon today"). Hidden is the right choice for planned, longer-term removal ("we are dropping this item for the winter").
When an item is marked sold out, customers can still see it on the menu so they know it exists -- they just cannot add it to their cart. This is better than the item silently disappearing, which can confuse regulars who come specifically for that item.
Pricing: Base Price and Options
The base price is what you enter in the Details step. This is the starting price customers see on the item card.
When a customer selects options, the price adjusts based on price deltas from the attached option groups. For example:
| Amount | |
|---|---|
| Base price (Latte) | 4.50 |
| Size: Large (+2.50) | +2.50 |
| Milk: Oat (+0.50) | +0.50 |
| Extra Shot x1 (+1.00) | +1.00 |
| Customer pays | 8.50 |
The base price should always reflect what a customer pays with the default options. If "Small" and "Regular Milk" are the defaults, those should have deltas of +0.00. Only upgrades and extras should add to the price.
A more detailed example with multiple groups:
Imagine a Pizza Margherita at 12.00 base price:
| Selection | Type | Delta |
|---|---|---|
| Base price | -- | 12.00 |
| Size: Large (Options group) | Upgrade | +4.00 |
| Crust: Stuffed (Options group) | Upgrade | +2.00 |
| Extra Cheese x2 (Modifiers group) | Add-on | +1.00 x 2 = +2.00 |
| Remove Basil (Ingredients group) | Removal | +0.00 |
| Customer pays | 20.00 |
See Options & Extras for a detailed explanation of price deltas, group types, and how they work.
Assigning Items to Categories
Each menu item belongs to one category. This determines where it appears in the customer's menu tabs.
You assign a category in the Details step of the item wizard. You can:
- Select an existing category from the dropdown
- Create a new category by typing a name that does not exist yet
- Leave it unassigned (the item goes to Uncategorized -- not recommended)
To change an item's category later, edit the item and select a different category, or drag the item to a different category header in the menu view.
Reordering Items (Position)
Items can be reordered within their category using drag-and-drop:
- Grab the drag handle (vertical dots icon) on the left side of the item row
- Drag the item up or down within its category
- Release to drop -- the new order saves automatically
The order you set here is the order customers see in the app. Put your best-sellers and signature items near the top.
Reorder your items based on sales data. Your top three sellers should be at the top of their category. Customers often order from the first few items they see.
Moving Items Between Categories
To move an item to a different category:
Drag and drop: Grab the item by its drag handle and drag it over the header of the target category. The category name bar highlights in orange. Drop the item -- it moves to the end of that category.
Edit the item: Open the item editor and change the Category in the Details step.
Deleting Items
- Find the item in the menu list
- Click the delete (trash) icon on the item row
- Confirm the deletion
Deleting a menu item is permanent. If you might want the item back later, hide it instead by setting it to inactive. Hiding preserves all your configuration.
Menu List Columns
The menu items table shows the following information at a glance:
| Column | Description |
|---|---|
| Image | Thumbnail of the item photo |
| Name | Item name as customers see it |
| Price | Base price (before options) |
| Status | Active (green badge) or Inactive (gray badge) |
| Options | Option groups linked to this item |
| Modifiers | Modifier groups linked to this item |
| Ingredients | Ingredient groups linked to this item |
| Created | Date the item was added |
Example: Adding a Cappuccino
Here is a complete example of adding a menu item from start to finish:
- Click Create Menu Item
- Select the Hot Drink template -- this auto-suggests the "Drinks" category
- On the Details step:
- Name: "Cappuccino"
- Price: 4.50
- Description: "Rich espresso with steamed milk and a velvety foam"
- Image: Select a cappuccino photo from the Asset Library
- Category: "Drinks" (already suggested by the template)
- On the Options step:
- Options tab: Link your "Size" group (Small +0.00, Medium +1.50, Large +2.50) and your "Milk Type" group (Regular +0.00, Oat +0.50, Almond +0.50)
- Modifiers tab: Link your "Extras" group for extra shots (+1.00 each) and syrup (+0.50 each)
- Ingredients tab: Link your "Standard Ingredients" group if applicable, hide any that do not apply
- On the Review step: Verify the summary, check the mobile preview on the right, and click Create Item
The Cappuccino now appears in your menu under "Drinks" and is immediately available to customers.
Frequently Asked Questions
Can I have the same item in multiple categories?
No. Each item belongs to exactly one category. If you want an item to appear in multiple places (e.g., "Lemonade" in both "Cold Drinks" and "Kids Menu"), create the item in the primary category and consider using a system category like "Popular" to give it additional visibility. Alternatively, you can create a second item with a slightly different name (e.g., "Kids Lemonade") if the portion or price differs.
What happens to active orders if I change the price?
Nothing. Orders that are already placed keep the price that was active at the time they were placed. The new price applies only to orders placed after the change. You can safely update prices at any time without disrupting in-progress orders.
How do I set up a lunch-only item?
OKeep does not currently support time-based visibility for individual items. The recommended approach is:
- Create a "Lunch Specials" category
- Add your lunch items to it
- At the end of lunch service, hide the items by setting them to inactive
- At the start of the next lunch service, set them back to active
If you do this daily, consider keeping the items in a dedicated category so you can find and toggle them quickly.
Can I duplicate an existing item?
Currently, items are created individually through the wizard. To create a similar item, create a new item and reuse the same option groups. Because option groups are shared, you only need to set the name, price, description, and image -- the options are linked in one click.
How many items can I have?
There is no hard limit on the number of menu items. However, for the best customer experience, keep your menu focused. A menu with 30--50 well-organized items in clear categories performs better than a menu with 200 items that customers have to scroll through endlessly.
Troubleshooting
Item not showing on customer menu
Check these in order:
- Is the item active? Open the item editor and verify the Active toggle is on. Inactive items are hidden from customers.
- Is the item assigned to a category? Items in the Uncategorized section still appear, but they are at the bottom of the menu and easy to miss.
- Is the service point available? If the service point (printer) is set to unavailable, customers cannot see the menu at all.
- Has the customer refreshed? Menu changes are immediate, but customers who already have the menu open may need to refresh their browser or reopen the app.
Price showing wrong to customers
The price shown on the item card is the base price plus the default option delta. If your default option has a non-zero delta, that delta is added to the displayed price.
Fix: Make sure your default options all have a delta of +0.00. The base price should represent the cost with default options selected. Only upgrades (non-default options) should have positive deltas.
Image not loading
- Check the Asset Library. Go to the Asset Library page and verify the image appears there. If it does not, re-upload it.
- Check the file format. JPG, PNG, and WebP are supported. Other formats may not display correctly.
- Check the file size. Very large images (over 5 MB) may take longer to load on slow connections. Resize to 800 x 800 px for the best balance of quality and performance.
Option groups not appearing on an item
- Verify the group is linked. Open the item editor, go to the Options step, and check each tab (Ingredients, Options, Modifiers). The group should appear in the list.
- Check for hidden options. If all options within a linked group are hidden for this item, the group will not display to customers.
- Verify the group has options. An empty option group (no options added yet) will not appear to customers.
Best Practices
- Use clear, descriptive names. "Iced Vanilla Latte" tells the customer what to expect. "Special #4" does not.
- Always add an image. Items with photos get more orders. Use the Asset Library to keep your images organized.
- Write short, useful descriptions. Focus on ingredients, flavor, and dietary info. Two sentences is plenty.
- Organize with categories. Every item should belong to a category. See Categories.
- Use option groups for variations. Do not create separate items for "Small Latte", "Medium Latte", "Large Latte". Create one item with a Size option group.
- Review prices regularly. Ingredient costs change. A quick monthly check keeps your menu accurate.
- Hide instead of deleting. Preserves your configuration for when you need the item again.
- Put your best sellers first. Reorder items within each category so the most popular ones are at the top.
- Test with a real phone. After setting up items, scan a QR code on your phone and browse the menu as a customer would. Catch layout issues and confusing names before customers do.
Related Pages
- Categories -- organize items into browsable groups
- Options & Extras -- create reusable option groups for customization
- Add a Menu Item -- step-by-step tutorial walkthrough
- Create an Option Group -- step-by-step tutorial for option groups
- Asset Library -- manage images for your menu items