Promo Stories
Create promotional stories that appear in the customer app. Organize them into groups with scheduling, and use the built-in story editor to design image or video content.
How Promo Stories Work
Promo stories are short promotional pieces -- images or videos -- displayed to customers in the mobile app. They are organized into Promo Groups, which control scheduling and recurrence. Each group contains one or more individual Promos (stories) that customers swipe through.
The flow is:
- Create a Promo Group (sets the schedule)
- Add Promos (stories) inside the group (sets the content)
- Design each story with the Story Editor or upload a video
- Publish when ready
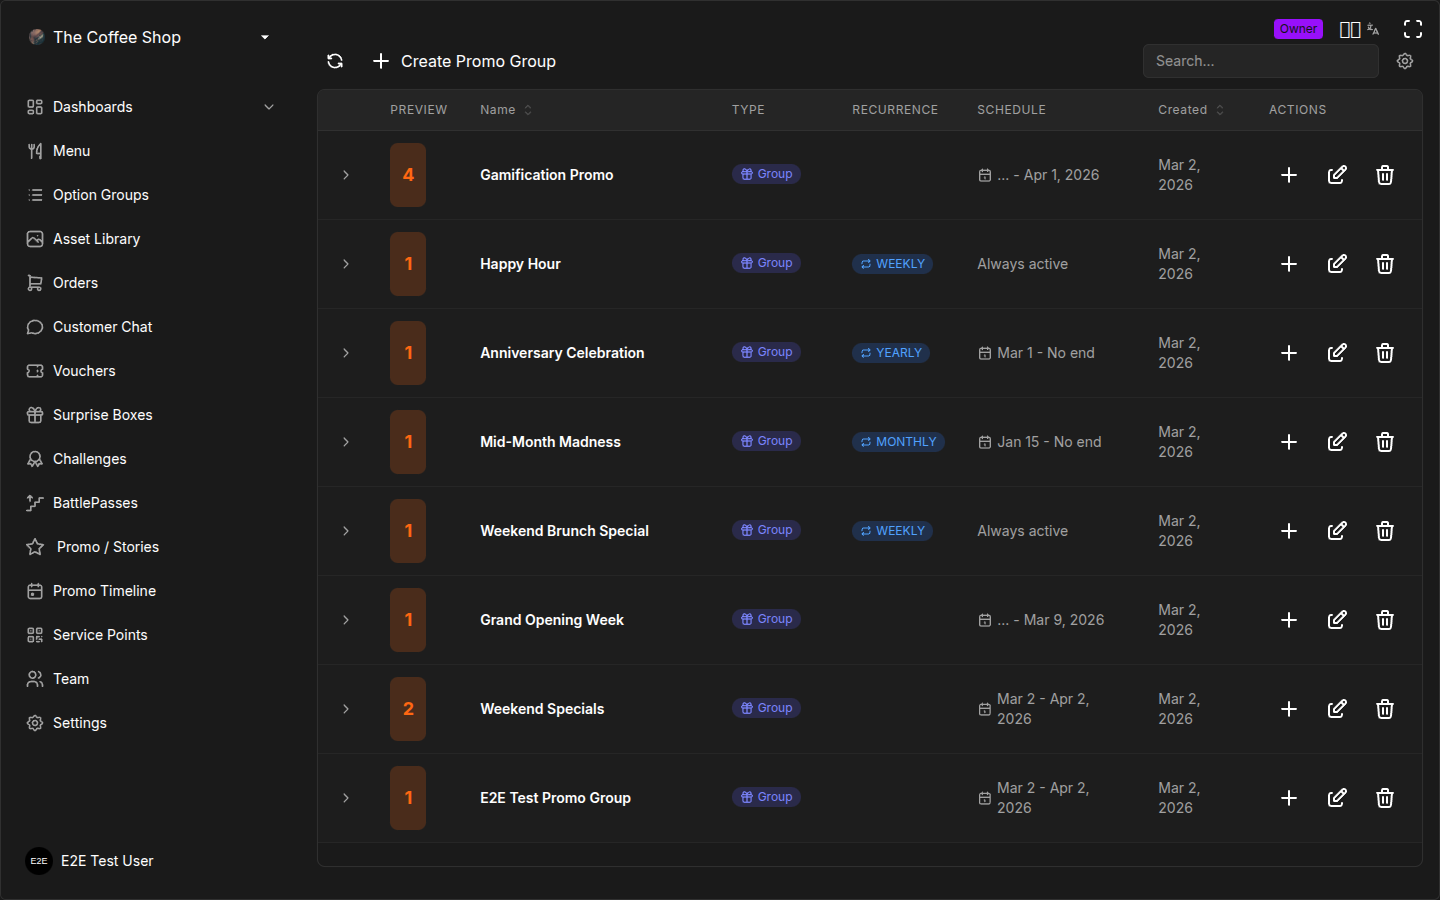
The Promo Stories Table
The Promo Stories page uses an expandable table. The top level shows your Promo Groups, and expanding a group reveals the individual Promos inside it.
Group Columns
| Column | Description |
|---|---|
| Name | The group name |
| Promos | Number of stories in the group |
| Recurrence | Badge showing NONE, WEEKLY, MONTHLY, or YEARLY |
| Created | Date the group was created |
| Valid Period | Start and end dates for the group |
Promo Columns (Expanded)
| Column | Description |
|---|---|
| Thumbnail | Preview of the story image or video frame |
| Video | Badge shown if the promo is a video |
| Status | Draft or Published |
| Hotspots | Number of interactive hotspot zones (video only) |
Creating a Promo Group
A Promo Group defines when and how often your stories are shown to customers.
- Go to Marketing > Promo Stories
- Click Create Group
- Fill in the group details:
- Name (required): A descriptive name, e.g., "Summer Menu Launch"
- Start Date: When the group becomes active
- End Date: When the group stops showing
- Recurrence Type: How the group repeats (see below)
- If using recurrence, configure the additional schedule options
- Click Save
Recurrence Types
| Type | Behavior | Additional Options |
|---|---|---|
| None | Shows continuously between start and end dates | -- |
| Weekly | Repeats on selected days each week | Valid Days: Select which days (Mon--Sun) |
| Monthly | Repeats monthly | -- |
| Yearly | Repeats yearly | -- |
Available Hours
For any recurrence type, you can restrict when stories are visible during the day:
- All Day: Stories show at any time (default)
- Custom Hours: Set a From and To time range, e.g., 11:00 AM -- 2:00 PM for a lunch promo
Adding a Promo (Story) to a Group
Each promo inside a group is one story slide that customers see.
- Expand the Promo Group row in the table
- Click Add Promo
- Choose the Content Type:
- Image Story (default): A designed image using the story editor
- Video: An uploaded video clip
- Fill in the details:
- Name (required): Internal name for the promo
- Description (optional): Notes about this promo
- Click Save to create the promo in Draft status
Designing an Image Story
The Story Editor is a canvas-based design tool built into the CRM. It lets you create visually rich story images without needing external design software.
Opening the Editor
- Find your promo in the expanded group
- Click Edit Story
- The story editor opens full-screen
Editor Layout
- Left panel: Layer list and add-element buttons
- Center: The story canvas (portrait format)
- Right panel: Properties sidebar for the selected element
Adding Elements
You can add the following elements to your story:
Text
- Click the Text tool
- Click on the canvas to place a text box
- Type your text
- Use the right sidebar to adjust:
- Font and size
- Color (pick from theme or custom)
- Position (X, Y coordinates)
- Rotation and opacity
Images
- Click the Image tool
- The Asset Library picker opens
- Select an image from your library or upload a new one
- Place and resize the image on the canvas
- Adjust position, size, and opacity in the right sidebar
Shapes
- Click the Rectangle or Circle tool
- Click on the canvas to place the shape
- Use the right sidebar to adjust:
- Fill color and border color
- Size (width, height)
- Position and rotation
- Opacity
Color Variables
The editor supports color variables that match your brand colors. When you select a color, you can choose from your defined palette to keep stories consistent with your branding.
Working with Layers
- Elements are stacked in order -- items higher in the layer list appear on top
- Drag layers to reorder them
- Click a layer to select the corresponding element on the canvas
Undo and Redo
Use the Undo and Redo buttons in the editor toolbar to step backward or forward through your changes. The editor tracks your full editing history for the current session.
Saving Your Design
Click Save in the editor toolbar. The design is saved and a thumbnail is generated for the table view.
Uploading a Video Promo
Video promos let you show short video clips as stories with optional interactive hotspots.
Video Requirements
| Requirement | Limit |
|---|---|
| Formats | MP4, MOV, WebM |
| Maximum duration | 15 seconds |
| Maximum file size | 50 MB |
Uploading a Video
- Create or edit a promo with Content Type set to Video
- In the upload area, either:
- Drag and drop a video file onto the upload zone
- Click to browse and select a file from your computer
- Wait for the upload to complete
- A preview of the video appears once uploaded
Adding Hotspots to Videos
Hotspots are interactive zones on video frames. When a customer taps a hotspot while watching the video story, it can trigger an action (e.g., open a menu item or navigate to a page).
- Open the video promo for editing
- Navigate to the video frame where you want the hotspot
- Click Add Hotspot
- Draw the hotspot zone on the video frame
- Configure what happens when the customer taps the hotspot
- Save your changes
The hotspot count is shown in the promo table so you can see at a glance which videos have interactive elements.
Publishing and Unpublishing
Promos are created in Draft status. They are not visible to customers until published.
To Publish
- Find the promo in the table
- Click the Publish action
- The status changes to Published
- The promo becomes visible to customers during the group's scheduled times
To Unpublish
- Find the published promo
- Click Unpublish
- The status reverts to Draft
- The promo is immediately hidden from customers
You can publish and unpublish individual promos without affecting other stories in the same group. This is useful for A/B testing or rotating content.
Editing Promos and Groups
Editing a Promo Group
- Click the Edit button on the group row
- Update the name, schedule, or recurrence settings
- Click Save
Changes to the group schedule affect all promos inside it.
Editing a Promo
- Expand the group and find the promo
- Click Edit to change the name, description, or content type
- Click Edit Story to open the story editor (image promos) or update the video (video promos)
- Save your changes
Deleting Promos and Groups
Deleting a Single Promo
- Find the promo inside its group
- Click Delete
- Confirm the deletion
Deleting a Promo Group
- Click Delete on the group row
- Confirm the deletion
Deleting a group removes all promos inside it.
Deletion is permanent. Published promos that are deleted will immediately stop showing to customers.
Best Practices
Content Tips
- Keep image stories visually clean -- one message per slide
- Use short, bold text that is readable on mobile screens
- Keep videos under 10 seconds for best engagement
- Use hotspots sparingly -- one or two per video is ideal
Scheduling Tips
- Use Weekly recurrence for rotating daily specials (e.g., "Taco Tuesday" on Tuesdays only)
- Set Available Hours to match the promotion window (e.g., lunch deals from 11:00--14:00)
- Create groups in advance and leave promos in Draft until launch day
Organization Tips
- Name groups by campaign or season: "Spring 2025", "Weekend Brunch Specials"
- Keep related promos in the same group so they share a schedule
- Archive old groups by deleting them after the campaign ends
Content Creation Tips
Image Dimensions and Format
Story images are displayed in portrait format (9:16 aspect ratio) on mobile devices. Design your content to fill this space:
| Property | Recommended Value |
|---|---|
| Aspect ratio | 9:16 (portrait) |
| Resolution | 1080 x 1920 pixels |
| Format | PNG or JPG |
| File size | Under 2 MB for fast loading |
What Makes a Good Promo Image
- One message per story: Do not cram multiple offers into a single image. "20% off cold drinks 3-5 PM" is one message. If you have a second offer, make it a second story in the same group.
- Large, readable text: Customers view stories on their phones. Use text that is readable at arm's length — at least 48px font for headlines, 32px for body text in the story editor.
- High-contrast colors: White or bright text on a dark background, or dark text on a light background. Avoid placing text over busy photo areas where it gets lost.
- Show the product: If you are promoting a menu item, include a clear photo of it. A picture of your signature latte sells better than text alone.
- Include a call to action: "Order now", "Available today only", "Tap to see the menu" — tell the customer what to do next.
Text on Images
The story editor lets you place text directly on your images. Follow these guidelines:
- Headline: Bold, large, 3-5 words maximum. Example: "Happy Hour Is Back"
- Subtitle: Smaller text with the details. Example: "20% off all cold drinks, Mon-Fri 3-5 PM"
- Avoid walls of text: If you need more than two lines, the message is too complex for a story. Use multiple stories or simplify the offer.
- Use brand colors: The story editor supports color variables that match your brand palette. Use them for consistency across all your stories.
Scheduling Strategies
When to Post
| Time | Best For |
|---|---|
| 7-9 AM | Breakfast and morning coffee promos |
| 11 AM-12 PM | Lunch specials (show before customers decide where to eat) |
| 2-3 PM | Afternoon snack or happy hour previews |
| 5-6 PM | Dinner specials |
| Friday afternoon | Weekend event announcements |
Frequency Guidelines
- 1-3 active stories per week is the sweet spot. More than that and customers start ignoring them.
- Rotate content every 1-2 weeks. Even a great promo gets stale if customers see the same story for a month.
- Seasonal campaigns: Create a promo group for each season (Spring Menu, Summer Specials, Holiday Offers) and fill it with 3-5 stories that rotate.
Seasonal Planning
Plan your promo groups around your business calendar:
| Season | Promo Ideas |
|---|---|
| January | New Year resolutions — healthy menu items, detox drinks |
| February | Valentine's Day — dinner for two deals, dessert specials |
| Spring | New seasonal menu launch, outdoor seating promos |
| Summer | Cold drinks, ice cream, happy hour extensions |
| Back to school | Quick lunch deals, student discounts |
| October | Halloween-themed items, spooky desserts |
| November-December | Holiday menu, gift vouchers, catering promos |
Combining with Other Features
- Pair stories with challenges: Create a story announcing a new challenge, then set the story's schedule to match the challenge duration.
- Promote battle pass tiers: When you launch a new battle pass, create a story series showing each tier's reward.
- Announce new menu items: When you add items to the menu, create a story with a photo and the item name. Customers who see the story are more likely to try it.
Frequently Asked Questions
Can I edit a live (published) promo? Yes. Click Edit on the published promo to change its name, description, or content. You can also open the story editor to modify the image. Changes are reflected immediately — there is no need to unpublish and republish. However, customers who have already seen the old version may see the updated version only on their next app session.
How many promos can run at once? There is no hard limit on the number of active promo groups or published stories. However, customers see them in a horizontal swipeable strip in the app. If you have more than 5-6 active stories at once, customers are unlikely to swipe through all of them. Keep the active count manageable.
Do customers get notified when a new promo is published? Customers see promo stories when they open the app during the group's scheduled time window. There is no push notification specifically for new stories. If you want to draw attention to a big promotion, pair the promo story with a challenge or voucher that does generate a notification.
Can I reuse a promo group from last year? You cannot directly duplicate a group, but you can create a new group with the same settings and add similar stories. If you saved your design assets in the Asset Library, you can reuse those images in the story editor.
What happens when a promo group's end date passes? The group and its stories stop being visible to customers automatically. The group remains in your table with its history intact — you can review past promos, but they will not show in the app. Delete old groups periodically to keep your marketing dashboard clean.
Can I schedule a promo to start in the future? Yes. Set the Start Date on the promo group to a future date. The stories will not appear to customers until that date arrives. This is useful for preparing campaigns in advance — design your stories today, set the start date for next Monday, and everything goes live automatically.
What is the difference between a promo story and an automatic promotion? Promo stories are marketing content — images and videos shown in the customer app to promote your business. They do not automatically apply discounts. Automatic promotions are pricing rules that change item prices based on schedules, categories, or conditions. Use promo stories to tell customers about your offers, and automatic promotions to apply the actual discounts at checkout.
Scheduling Overview
For a visual overview of all your active and upcoming promos alongside challenges and battle passes, see the Promo Timeline.